


Sidechaining: A Brief Introduction and Tutorial
1) What is sidechaining?
Sidechaining is a method of using the peak volume of an instrument (usually a kick drum) to control the volume of another instrument (usually a synth pad or lead). That's it! Fairly simple concept, no?
2) What is it used for?
Sidechaining is used frequently in Trance music. It can be used to either accent the kick drums or in a more complex fashion be used to turn single sustained notes into a bass line.
3) What does it sound like?
The result of successfully sidechaining produces a 'boom wah' effect in your music. The sidechained instrument drops out of the song when the kick hits (boom), and then fades back in (wah) as the kick volume fades.
4) How do I do it?
Ok, so this is where the meat of the tutorial lies. If you follow the following steps correctly, you will be well on your way to sidechaining awesomeness. It takes a lot of fiddling to get it right, so don't be discouraged if it doesn't work out well the first time - you'll get better with practice!
Note: I'm running FL Studio 9. Don't freak out if your interface looks different.
4.1) Set UpBoot up FL Studio and open File>New from template>Minimal>Basic. You should have a screen that looks like this.
4.2) Instrument Selection and PatternsOpen up the instrument you would like to sidechain and load it into the step sequencer, in the second slot. We'll use the generic kick drum for now, so don't bother changing that one. Next, make sure that your chosen sound is routed to FX track 2. Make sure that the kick drum is likewise routed to FX track 1.
Make sure that when you play the synth, the channel volume is displayed in insert 2, and when you play the drum, the channel volume is displayed in insert 1.
Next we are going to draw the patterns for the kick and the synth. Place 4 kicks, one on each beat, and then open up the piano roll for the synth by Right click>Piano roll. Now would also be a good time to change our BPM to 120 or so (unless you're a hardstyle kind of dude XD).
In the piano roll draw one note that lasts four beats. In the mixer, on insert 1, choose Fruity Peak Controller in the drop down menu. Look at your step sequencer volume knobs and make sure that they are about equal.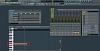
Results 1 to 6 of 6
Forum: Tutorials Thread: Tutorial: Sidechaining (Shortcut) - FL Studio 8/9
Threaded View
-

 11-06-2010 #1
Artist - Credits
- 11
- Join Date
- Jun 2010
- Posts
- 17
- Thanks

- 0
- Thanks

- 0
- Thanked in
- 0 Posts
Tutorial: Sidechaining (Shortcut) - FL Studio 8/9
Last edited by DJ Meckanizm; 11-06-2010 at 21:32.
[B]-DJ Meckanizm[/B]
soundcloud.com/djmeckanizm
 Posting Permissions
 Reply With Quote